What is the function of the rear bumper light
The rear bumper light of a car, as the taillight of a vehicle, is a key signaling device to ensure driving safety. Its main function lies in conveying clear information to the vehicles behind to ensure the safety and smoothness of the road.
The rear bumper lights come in various types: brake lights, which light up during emergency braking and are designed in a striking red color to warn the following vehicles to avoid collisions; Fog lights, used in weather conditions with poor visibility, enhance the penetrating power of the light and help drivers behind identify the vehicle in front. The width indicator light provides a visual indication of the vehicle's width, assisting in the judgment during parallel running and overtaking. The reversing lights come on when reversing, illuminating the road behind the vehicle and ensuring the vigilance of pedestrians and vehicles behind. The turn signal flashes when the vehicle changes direction to alert other road users. In addition, there are hazard warning lights, also known as hazard warning lights, which are used to alert other vehicles and pedestrians in emergency situations.
These rear bumper lights function just like traffic signals, clearly conveying the driver's intentions and providing an important guarantee for driving safety. They are used in combination to enable drivers and surrounding traffic participants to share information and jointly maintain the safety and smoothness of road traffic order.
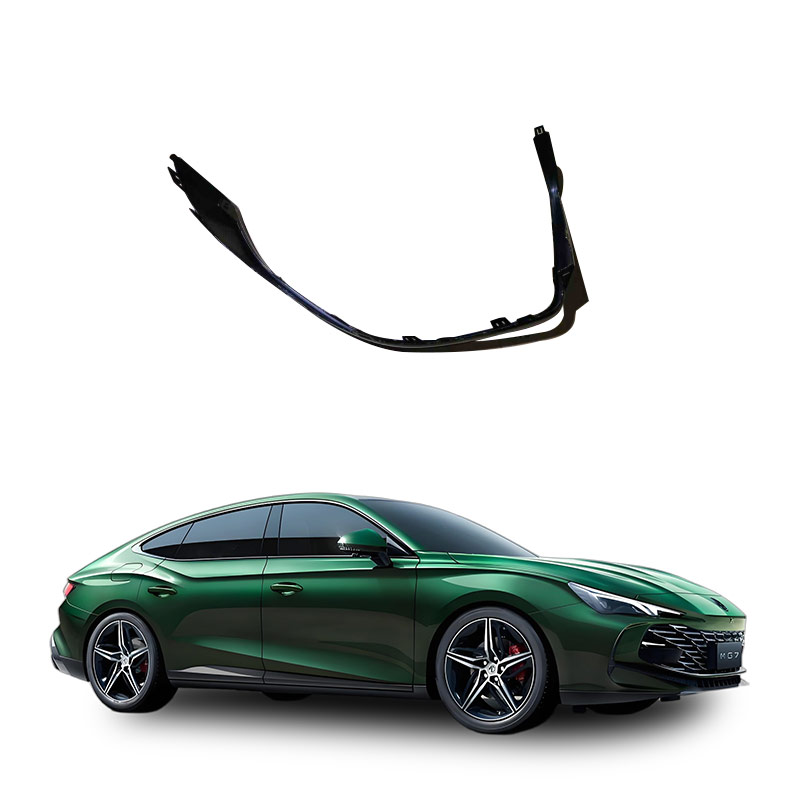
The bright strip of the bumper is made of plastic and its function is: to protect pedestrians; It has a decorative effect; Reduce the impact force when an accident occurs; Protect the front and rear of the vehicle body.
Remove the bright strip of the rear bumper and get the tools ready first. A hammer and a pair of military boots. Disassembly: (Start from both sides and then the middle) Begin from the edge of the bright strip. Used credit cards and other items can be inserted and removed. When there is a gap, take it slowly and disassemble it slowly. To prevent the paint from getting dirty.
Moreover, if there is any residual glue after disassembly, it can be wiped clean with a soft cloth dipped in essential balm. After this operation, please make sure that the essential balm has been cleaned thoroughly before pasting the new bright strips. There are many methods, such as detergent and alcohol. Packaging: (Middle first, then sides) Tear off the tape on the back to expose the grey adhesive, and then stick it in the correct position.
Never press the rubber surface too hard all at once. First, gently place it down to check the overall position. After confirming that it is in the right position, press it harder.
The steps for replacing the rear bumper reflective strip are simple and can be easily completed. First, open the trunk lid and take out the small tool wheel and No. 10 socket from the toolbox. Next, remove the nuts of the fixed outer taillights. Be sure to keep the removed nuts for reinstallation. Then, unplug the wire harness plug of the rear outer taillight, gently hold the lamp body and pull it out. At this point, the reflective strip can be easily replaced. When replacing, it is necessary to select the reflective strips suitable for the vehicle model. Finally, install the new reflective strip onto the rear bumper, and reinstall the rear exterior taillights following the reverse steps. Make sure all nuts are tightened and the wiring harness plugs are connected correctly. After completing these steps, your rear bumper reflective strip has been successfully replaced, ensuring that the vehicle complies with safety regulations and has a completely new appearance.
If you plan to remove the bright strip from your vehicle, please follow these steps: First, open the car door. You will find a screw on the inner side of the door. This screw is responsible for fixing the bright strip at the bottom of the car door. Please remove it. Next, please lower the car door glass to the lowest position, then gently lift the right half of the bright strip at the bottom of the car door upwards. Note that the force should be moderate, just enough to hold the bright strip firmly. After that, hold the far right end of the bright bar tightly and pull it out steadily towards the rear of the vehicle. During this process, please pay special attention not to lift the bottom bright strip too high, as the upper bright strip and the bottom bright strip are connected by a plastic triangular connector. Excessive lifting may cause the connecting parts to break and the bottom bright strip to deform, thereby affecting its reinstallation. After successfully removing the bottom bright bar, the disassembly of the upper bright bar becomes relatively simple. The upper bright strip is mainly fixed by the snap. You just need to stand on the inner side of the car door, pull it outward with your hand, and gradually apply force in the direction from left to right towards the rearview mirror to smoothly remove the upper bright strip.
If you want to know more, keep reading the other articles on this site!
Please call us if you need such products.
Zhuo Meng Shanghai Auto Co., Ltd. is committed to selling MG&750 auto parts welcome to buy.